


Submit an Event to the CalendarLet everyone know about your next event by adding it to the website calendar.
Submit an Event

Academic News Submission FormNeed some help writing a story? Submit your tips for the Marketing Department here.
Submit a Story Idea
Beginner TerminalFour Training
Before you use TerminalFour, you'll have to complete training. This training is self-paced and easy to complete!
Training Resources
Already attended training, but need some extra help? Take a look at some of our training resources.
Prefer learning with videos? We've created a series of training videos that will help you through some basic T4 operations.
T4 How-Tos
We've put together some step-by-step instructions for some of the common T4 actions — check them out below!
Topics can be anything from an event overview to an award announcement to a policy update or anything else that's going on in your department. There's always something happening in your area of the University and no one knows what's going on better than you!
Step 1: Create a section in the appropriate category
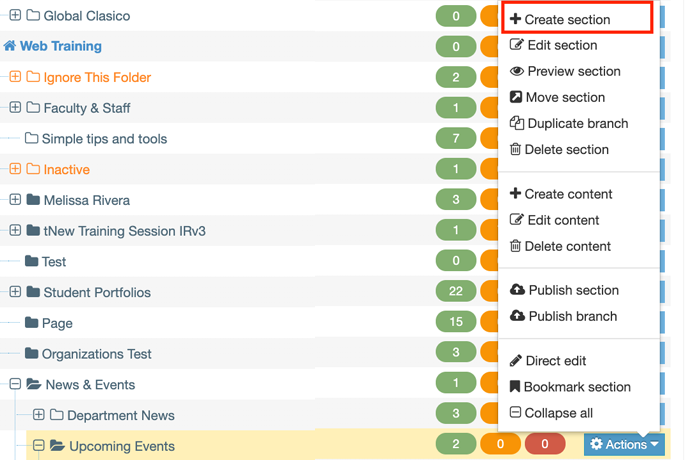
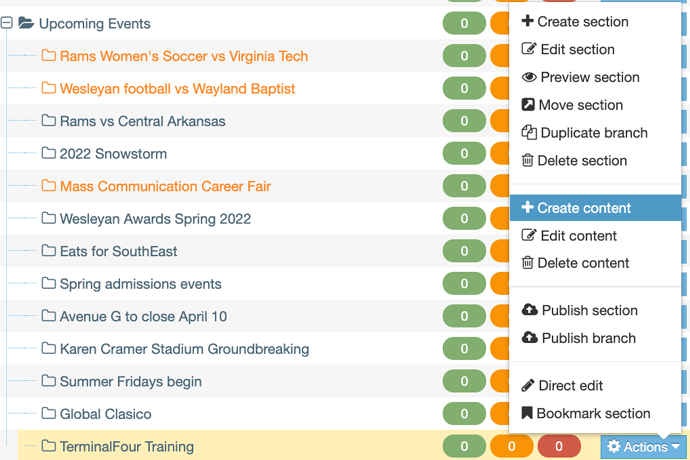
Find your department's "News and Events" section, expand it by clicking on the "plus" button to the left and then expand the news section. Within this section, find the category folder and then the category news archive where your story topic fits the best. Then, click the blue "Actions" button where the folder where your story belongs and click "Create Section".
Step 2: Name the section that you created
Fill in the "Name" and "Page Title" with the name of your news story, then uncheck the box next to "Show in Navigation." Click "Save Changes" and you're taken back to the main site structure
Step 3: Add your content item
Find the section you just created in the "News and Events" folder and click on the blue "Actions" button of the section. Click "Create Content." You'll be taken to another page where you'll choose "News Story" from the list of content types. You can scroll through the list or use the "Filter" box on the right to search.
Step 4: Fill in the name and author
Use the same headline for the "Name" field as you did for the section title and then select "Texas Wesleyan University" from the author drop-down menu.
Step 5: Fill in the release date
By default, T4 will insert the current date and time for the "Release Date" field. You cannot add a future date for the release date — T4 cannot schedule news posts. If you have a news stoery that needs to come out at a certain time, contact the Office of Marketing & Communications.
Step 6: Add your teaser, photo and story
Type your story teaser, select a photo from the Media Library and add your text for the news story.
Step 7: Choose your categories
First, select the "Title Category." This is your primary category and determines the text that displays above your headline on the live website. Next, choose your "Linked Categories." This allows you to add your story to more than one place on the website. The more linked categories you apply, the more coverage your story will get on the website.
Step 8: Choose your display options
You always want to select "Normal" so your story appears on your news and events page, but you can also select "Flame" if you would like your story to be considered for the Flame.
Step 9: Set your canonical link
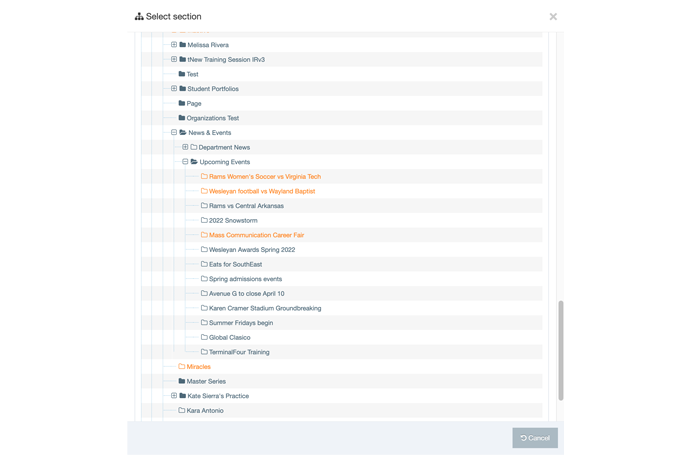
Click "Add section link" and a pop-up box with the site structure will open. Navigate to the News and Events section and select that you created for your story. Adding this link correctly is very important — if it is set incorrectly, your news story will not be accessible.
Getting your event added to the university calendar is a great way to promote your event to everyone that visits Texas Wesleyan's website — and adding an event is easier than you think! Just follow these simple steps to get an event added to the calendar.
 Step 1: Create your section
On our website, every news item and event gets its own page — also known as a section. This is because we want to be sure that every news item and event can be directly linked to — nobody wants to scroll through months of news and events to find their item!
In our site structure, most departments have their own News & Event section. If you do not see a News & Events section in your site structure, your news is more than likely handled by the department above yours. All majors and the majority of departments and offices on campus have their own pages.
Once you've located your section, adding a new section is as easy as selecting the blue "Actions" button on the right-hand side of the screen and selecting "New Section."
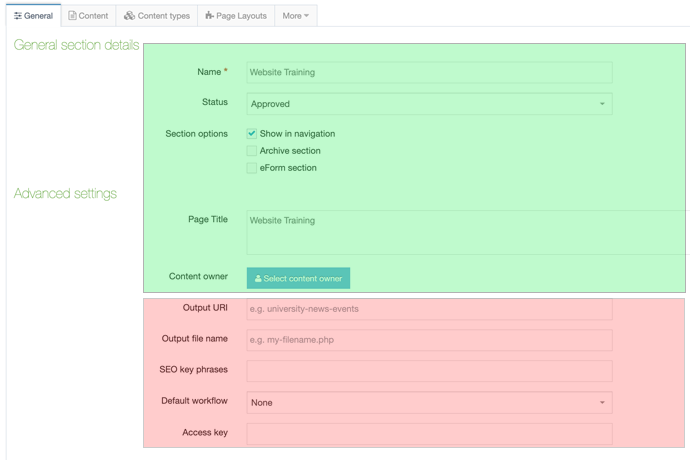 Step 2: Fill out your section details
Once you select "Add Content," you'll be directed to a page titled "Section Details." This is where you'll give TerminalFour the details of your new page.
Name — This is where you'll tell T4 what you want the section to be named. This will also become the end of the URL for your new page, so keep it under 80 characters, and try to use as little punctuation as possible. This will not become the headline for your event — this is just the name of the page.
Status — This determines if your page will be on the website.
- Approved: You're telling T4 that this page is ready to go on the site. When the site publishes at midnight, the section will go live.
- Pending: You're telling T4 not to make your page live. A section will not go live until someone changes the status to Approved.
- Inactive: You're telling T4 not to make your page live, and to remove it if it's already online. Users cannot delete sections and content from T4, marking it as Inactive is the closest you can get.
Section Options — This gives you a few choices that you can use. For our cases, always uncheck all of the boxes.
Page Title — On a regular page, this is what will show in the top banner. However, it will not show up for a News & Events entry. That being said, best practice is to fill it out with the same text that's in the "Name" field.
Everything below "Page Title" should be left alone. Changing options here can cause your page to break and not show up correctly on the live site.
Once you're done, click "Save" on the lower-right portion of your screen. T4 will then kick you out back to your site structure — this is totally normal.
 Step 3: Add your content
If a section is a room, then the content is your decor. Sure, you can have an empty room, but adding furniture makes it better! Content is the foundation of our website, and it's easy to add.
To add a new piece of content, click the blue "Actions" button next to your new section, and then select "Create Content." After you click that, you'll be directed to a page with a list of content types. We have hundreds of different content types, but we're just looking for "Event - TXWES." To make searching easier, try entering "Event" into the Filter box on the right side of your screen.
Once you've found the content type, simply click on the link that says "Event - TXWES" and you'll be directed to the next step!
Step 4: Enter your content details
Once you've selected "Event - TXWES," you'll be directed to a new page to enter your details.
- Name — Enter the same title here for the event as you did for the section title. This will serve as your headline for the event and determines what will show up on the university calendar.
- Author – This will always be "Texas Wesleyan University"
- Start Date and End Date — Enter the start date and time, and then enter the end date and time. If the event is all day, start the event at 12:01 a.m. and end it at 11:59 p.m.
- Teaser — This is a short, 1-2 sentence description of your event.
- Main Image — This is the image that will show when users click on your event. Make sure it's 690x460 pixels!
- Event Text — Enter your event details here! Keep the "Inverted triangle" method in mind — answer who, what, when and where in the first part of the event before moving on to the other details.
- Location — Scroll through the list of locations both on- and off-campus to find one for your event. If you don't see a location, then type a custom location into the box below the list. For virtual events, add the platform that the event will be hosted on.
- Display Options — Your options are "Featured," "Flame" and "Normal." "Normal" is automatically selected so your story appears on the calendar, but you can also select "Flame" if you want your event to appear in the weekly faculty/staff email. Select "Featured" when you want your event to appear in a featured spot in your upcoming events list feed on your department's website.
 Step 5: Set your canonical link
Click "Add Section Link" and a pop-up box with the site structure will open on the screen. Navigate to your News & Events section and select the section that you created for the story. It's very important to select your canonical link correctly or else the link to your story will go to the wrong page.
Step 6: Click Save!
You're all set! Click "Save" and then make sure to approve your story in the Approval Queue so that it can go for Marketing approval. Once approved, your event will be added to the University Calendar for all to see!
Have any questions? Email Ryan Stankard, the university's T4 contact, at stankard@txwes.edu.
Please note that the website cannot host videos. To add a video to your web page, please see the "Embedding videos" article on this page.
Adding Media to the Media Library
Step 1: Find the Media Library
Click on "Content" on the T4 menu on the left side of your browser. In the drop-down menu, you will find the Media Library.
Step 2: Select the appropriate folder
On the left side of the screen, you will see the library folders. Locate either your department's or your office's media folder. Chose "Add Media" from the top righthand corner of the media library window.
Note: If you click "Add Media" and you see a yellow dialog box on the bottom of your screen saying access denied, clear your browser cache and try again.
Step 3: Drop in the file and fill out the details
Upload your file by either dragging it into the gray box or clicking on the grey box and navigating to your file. Type the "Name" of your media item and add some alt text in the description. For more about alt text, check the article at the bottom of the page. Scroll down and fill in keywords — this is only for internal search, it makes it easier to find media items.
Step 4: Add your media
When you're ready, click "Save Changes" and your image will be added to the Media Library. Someone from the marketing team will approve your media, and then you can insert it onto your content or add it as a featured photo.
Note: Media approvals follow the same timeline as content approvals
Modifying Media
When updating a document or media item on the site, we recommend that you replace the existing media item instead of adding a new media item. Updating an existing media item saves space in the Media Library,v reduces clutter and confusion, and ensures that the media will be updated everywhere that it is used on the site.
Step 1: Find the correct media item in the library
There are a few different ways to do this:
- Search for your best guess of the media item name in the search box
- Download the media on the site and open it in a browser window. In the address bar, you should see the folder path of the media item. With that path, you can navigate to the correct media item.
Step 2: Ensure that you are editing the correct media
To do this, select the media item and then select the "Usage" tab in the header. This will detail everywhere that the media item is used on the site. If the path matches the page that holds the media item, you're good to go!
Step 3: Modify your media file
Click on the name of that file that you want to edit. Just like adding a new file, you can either drag a file to the grey box or click on the grey box and navigate to the correct file on your computer.
Media Library rules
- Do not upload videos to the Media Library
- Do not add editable files — this includes Word documents, Powerpoint presentations and Excel documents — unless absolutely necessary
- Pay attention to file names
- When you're uploading PDFs, be mindful of the name of the document — both in the title of the document and the name in T4. The name of your PDF media file is inserted into the content you add. The name of your document files is also seen when users open or download the file to their computers
- PDFs do not replace web content. Do not use PDF files when it seems like entering content into T4 is too time-consuming
Approving Content
Step 1: Navigate to the Approval Queue
Go to the main site structure and find the "Content" tab in the menu. Hover over the drop-down and select "Approve Content"
Step 2: Approve your content
Find the piece of content you are ready to approve, click the blue "Actions" button and select "Approve". This action will submit the content to the Office of Marketing & Communications for final approval.
If you'd like, you can approve multiple pieces of content at the same time. Just clock on the box on the far right to select the content, then scroll to the bottom of the page and click "Approve". This will send all selected content to the Office of Marketing & Communications.
Approving Media
Media does not need to go through the same approval steps as content. After you upload a media item to the proper location in the media library, the piece of media will be automatically elevated to Marketing & Communications approval.
Three rules to remember when approving content
1. Submit your content by 11 a.m.
Content must be submitted to the marketing approval queue before 11 a.m. to ensure that it will go live on the site at some point that business day. That does not mean immediately, but generally before the day is over. All content submitted after 11 a.m. will go live on the site the following business day. Flame content MUST be submitted by 11 a.m. on the Monday before the Flame is sent.
2. Communicate with those around you
Communications with the other members of your department to ensure that content is not pushed through the approval queue before it is ready.
3. Departments are the subject matter experts
With some exceptions, the Office of Marketing & Communications is not responsible for ensuring the accuracy of facts, dates and times on content. Make sure the facts are correct on your content before submitting it to the Office of Marketing & Communications.
We love video content! It's easy for users to get information, it makes pages look better and improves SEO. However, the T4 media library and our website are not capable of hosting videos on the website. In order to add a video, follow these easy steps.
Step 1: Navigate to your video on YouTube
Find your video as you normally would. If you or your department uploaded the video, make sure your sharing settings are set to "Public"
 Step 2: Copy the embeddable code
On the video, click the "Share" button and then select "Embed." Select all of the code that comes up and copy it to your clipboard.
Step 3: Add the code to your page with the Source Code window
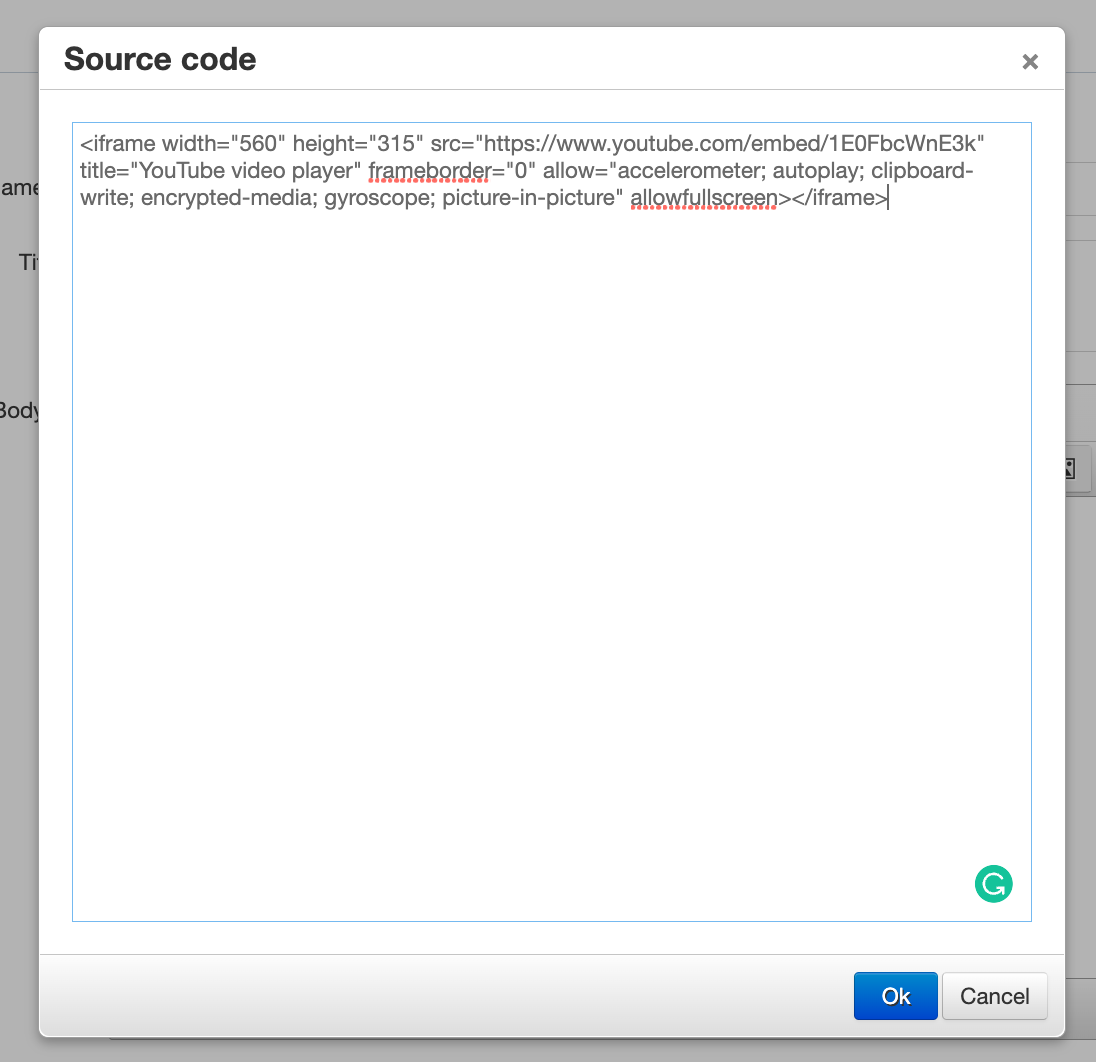 In your content on TerminalFour, select "Tools" in the menu bar and then select "Source Code." In the dialog that comes up, paste your embed code into the location where you want your video to appear. Click "Save."
Step 4: Save and approve your content
Click the blue "Save Changes" button in the lower-right corner and follow the appropriate approval steps to submit to Marketing & Communications.
Tables in TerminalFour can be confusing. Here's how to add a table to T4 — and then make it look good.
 1. Insert your table
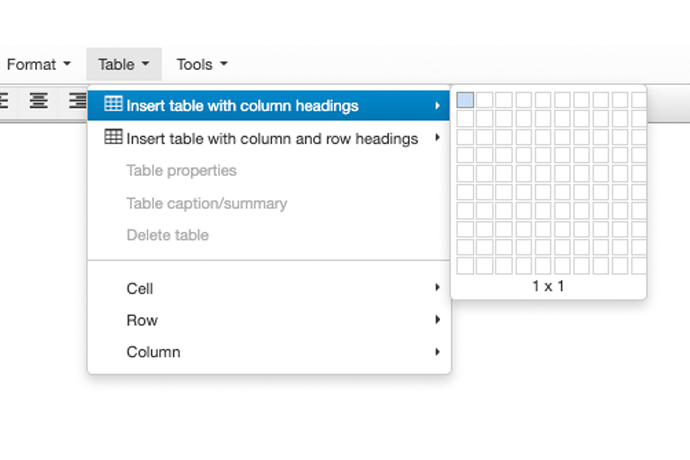
Under the "Table" menu item, select the "Insert table with column headings" option. In the dialog that pops up, select your table size. Be sure to add one extra row — we're going to delete the top row!
2. Enter your information
Starting from the second row, start adding your table data. Be sure to leave the column headings alone, we'll deal with those in the next steps. Run out of lines? Not an issue — simply go to your bottom-rightmost cell and press "Tab" on your keyboard. This will automatically advance your cursor and give you a new line to work with.
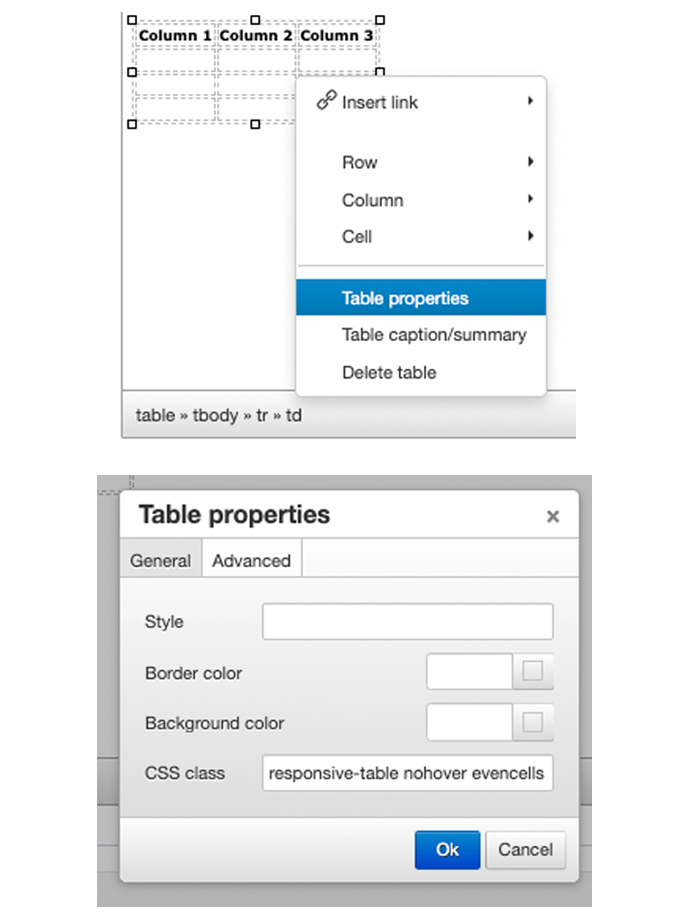
3. Format the table
Once you have all of your information inputted, it's time to make your table look the part. Right-click on your table and choose "Table properties". In the pop-up that opens, select the "Advanced" tab, and click in the "CSS class" box. In this box, enter the following, exactly as shown here.
responsive-table nohover evencells list
Once you've entered the text above, click OK. You will not see any changes in your table on the backend — this is totally normal!
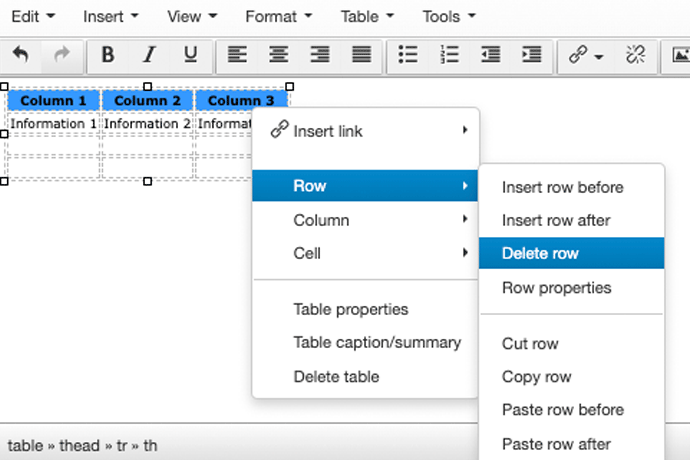
4. Delete the top row
Once you've entered the CSS class above, the header row no longer functions correctly and must be removed. To delete the row, select a cell in the top row, right-click and select "Delete row". This will remove your header row.
If you want headers on your table, simply make your second row your "header" row by bolding the text in the cell.
Section links are one of the three kinds of links that you can add in TerminalFour. They allow you to link to other pages on the txwes.edu domain — for example, txwes.edu/office-of-the-president or txwes.edu/alumni. Keep in mind that for links such as advancement.txwes.edu or westlibrary.txwes.edu you will have to use an external link.
Step 1: Highlight the text that you want the link to be
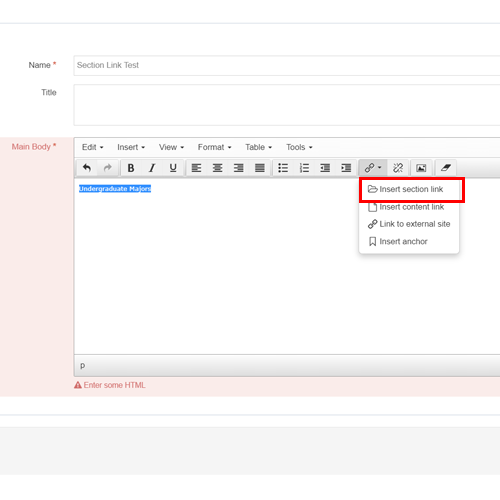 Step 2: Select "Insert Section Link" from the link menu (The one that looks like a chain)
There are three different link options on the link menu. For this purpose, we will choose "Insert Section Link". If you are working in Direct Edit mode, you will be looking for "Link to Another Page."
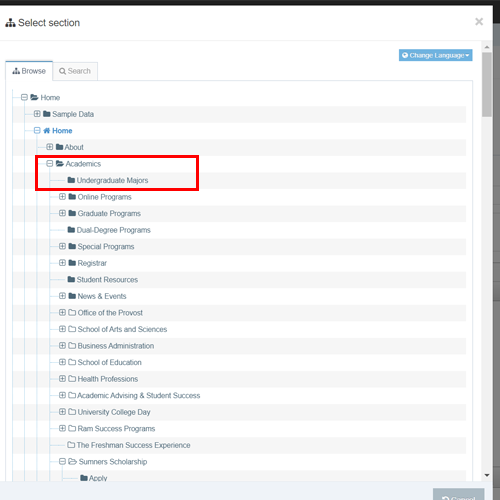 Step 3: In the site structure window, locate and click on the section that you want to link to
Hint: If you can't find the page that you are looking for in the site structure, navigate to the page on the live site and find the breadcrumb trail, located right below the page title.
Step 4: Done!
Your link is now created! Check out the guide on creating buttons for more information on how to make links pretty.
The external link is the second kind of three links that you can add in TerminalFour. This link type is used when you are linking to a site that is not on the txwes.edu domain. For example, if you want to link to the Department of Education, you will use this type of link. This will also be used for linking to domains such as advancement.txwes.edu — domains that begin with something other than txwes.edu.
Step 1: Select the text that you want to add a hyperlink to
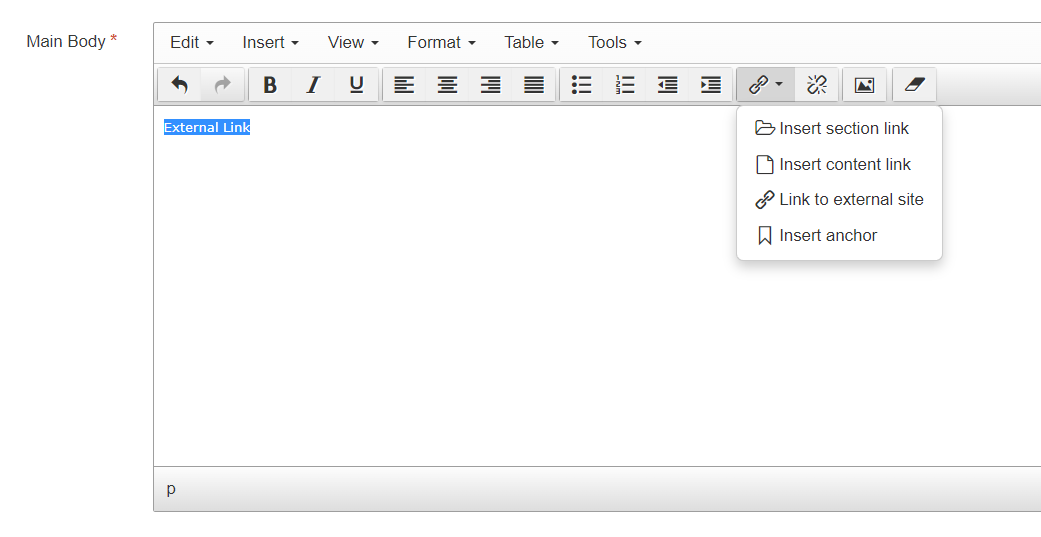 Step 2: Select the link icon (the little chain) and select "Link to External Site"
Note: If you are using Direct Edit mode, you will still select "Link to External Site"
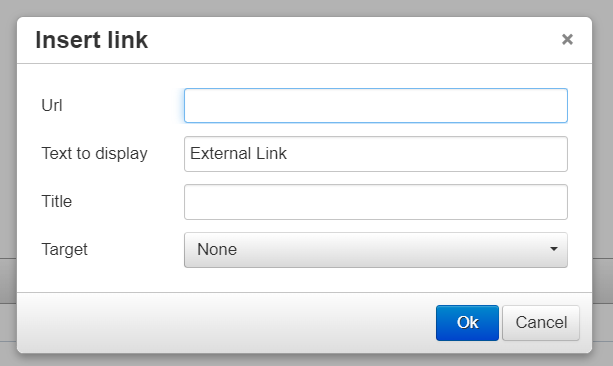 Step 3: Fill out the link fields
URL: Simply copy and paste from your URL bar in your browser
Text to Display: This will automatically populate with the text you highlighted.
Title: You can leave this field empty
Target: In this drop-down, select "Open in New Window." This tells TerminalFour to open the link in a new tab — that way, we don't kick people off the website
Step 4: Done!
You're all done! You can leave the link as-is, or you can follow the steps in the "Create a Button" cross expander to make the link pretty.
Embedding a photo into the body of your story is a great way to easily upgrade your story. Here's how to do it!
Step 1: Add your image
Place your cursor where you want your image, then add media using the "Add Media" button on the right side of the text edit.
Hint: The button looks like a sunrise or sunset over a mountain
Step 2: Double-click on the image to enter the Set Media Attributes window
Step 3: Enter your criteria
| Width | The width of your image |
| Height | The height of your image |
| Maintain Aspect Ratio | Always check this button — it constrains any resize and keeps the image from becoming warped or distorted |
| Border | Not used |
| Padding | Sets a space around the image and is measured in pixels. Setting one value (like 10px or 15px) will set a consistent pad around the image, while setting four values will specify each individual edge pad. The order is top, right, bottom, left. For example, the value "0px 10px 15px 0px" will result in no pad on the top or left, a 10-pixel pad on the right and a 15-pixel pad on the bottom. This is super useful because there is no need to pad the left side of an image. The actual size can range from 0px to 20px, but the most common is 10px. |
| Margin | Not used |
| Display | Not used |
| Float | Specifies where the image will justify. Your options are "left" and "right", but always float to the left! |
| Vertical-align | Not used. Be sure not to confuse this with float! |
Then click the blue Save button. You're all set!
Step 1: Navigate to the degree plan page for the major that you want to update
Step 2: Right-click the yellow "Download" button and select "Copy link address"
Step 3: In a new tab or window, paste that URL into the URL bar
Do not actually navigate to the page, as it will automatically download! You can also paste the URL into a Word document or Notepad instance. This is your breadcrumb trail that you will use to find the degree plan in the Media Library.
Example: https://txwes.edu/media/twu-training/BS-in-CSC-SP23NEW-(1).pdf
This will be located in the Media Library >> TWU Training >> BSComputer_Science_DegreePlan_2019.pdf
Step 4: Once you've located your file, click on the Media Item and select the "Usage" tab.
The Usage tab will allow us to confirm that the Media Item that we clicked on is the one that we want to update on the website. An empty Usage tab indicates that the Media Item is not being used anywhere on the website, and it is the incorrect item. If the Usage tab displays a path to the Degree Plan page, you are on the correct item.
Step 5: Update and approve the Media Item as usual!
Have a ton of content to place on a page? Consider using a cross expander! They're a fantastic way to condense what would otherwise be a wall of text into more managable and readable chunks.
There are three different styles of cross expander that you can use — all of which are available to Moderators.
Cross Expander
This is the most basic cross expander — it's actually the one you opened to see this! It appears as a blue bar with a small plus next to it that the user opens to view their content.
Cross Expander - Minimal
Think of this as a more modern, lighter cross expander. This cross expander ditches the blue bar but maintains the plus for users to interact with.
Cross Expander - Minimal List
This is the least-used cross expander. The Minimal List cross expander moves the plus to the right and uses a slightly smaller font.
Adding a new cross expander
Adding a cross expander is as easy as adding in any other type of content! Here's how to do it.
Step 1: In Direct Edit mode, click "Add Content" on the space that you want to have a cross expander.
Step 2: Filter by content type and select your expander of choice
Step 3: Fill in the fields
Name: For internal use only, this will not appear to the site users.
Title: This is the title of the cross expander and will appear on the expander, whether or not the expander is opened.
Body: The main content of your expander. Anything you can do in General Content, you can use in the expander
Opened: Select this box if you want the expander to be automatically opened when a user visits the page. By default, this is unchecked.
Step 4: Save and approve your content
Editing a Cross Expander
Editing is the exact same as editing General Content. To edit from Direct Edit, simply click on the content that you want to edit, make your edits and then save and approve your content.
Need to add a new faculty or staff member to a page? Check out the video below for instructions.
How to clear your cache
Seeing something on the website that you know you fixed? It might be your cache. Check out the instructions below about how to clear your browser's cache.
- On your computer, open Chrome
- At the top right, click "More" (It's the three dots)
- Click More Tools and then select Clear Browsing Data
- At the top, choose a time range. We recommend selecting "All time"
- Next to "Cookies and other site data" and "Cached images and files," check the boxes.
- Click Clear data
Your cache is now cleared!
- In the Menu bar at the top of the screen, click Firefox and select Preferences
- Select the Privacy and Security panel
- In the Cookies and Site Data section, click Clear Data
- Remove the checkmark in front of Cookies and Site Data
- With Cached Web Content check marked, click the Clear button
Your cache is now cleared!
Resources
Alternative text, or alt text, is an important accessibility feature on the Texas Wesleyan website. It is read by screen reader software, helps search engines index our site and displays in the case of an image not loading — which can be critical for someone on an older device or slow internet connection.
Tips to writing great alt text
- Think Tweets — make it short, sweet and descriptive!
- Do not include "image of" or "photo of"
- Keep it to two sentences, or ideally fewer
The University of South Carolina's Digital Accessibility team laid out five easy steps to writing great alt text every time!
1. Examine the image closely
Think about everything that's happening in the image. What visual information is it conveying? What information would you not have if you could not see the image?
2. Consider information implied by the image beyond the visuals
is the image implying a mood, feature or activity not mentioned elsewhere on the screen where it will appear?
3. Don't begin with "Image of..."
A screen reader will tell the person listening to your alt text that this is an image. However, DO mention if your visual is a particular type of image like an illustration, headshot, infographic, collage, etc.
4. Include any and all words in the image
It's best to avoid using images with text embedded in them. However, if words are part of your visual, you must include them in your alt text.
5. Determine if the layout is communicating meaning
For images like infographics, where the image's composition makes a difference in what is being communicated, you'll need to explain that layout and its meaning in your alt text.
Confused about AP Style or need clarification? Check out this cheat sheet.
| Academic degrees |
|
|
| Addresses |
|
|
| Commas |
|
Rams football, basketball and golf "This is a great website," Stankard said. |
| Days of the month | Use only numerals — do not use "nd," "rd," or "th" | Sept. 14, 2022 |
| Duration |
|
|
| Hyphens | Use hyphens to link all the words in a compound adjective | "The five-year plan called for the construction of a new stadium" vs "The plan will take five years and calls for the construction of a new stadium" |
| Job titles |
|
|
| Kickoff vs kick off |
|
|
| Months |
|
|
| Names |
|
|
| Numbers |
|
|
| Spaces |
Use only one space between sentences |
"Willie the Ram is Texas Wesleyan's mascot. He is a six-foot-tall ram." |
| Times |
Use "a.m." and "p.m." If the event takes place at 12 p.m., use "noon" |
1 p.m., 7 a.m., noon |
| Titles of publications |
AP Style does not allow for italics — when using the name of a publication, put it in quotation marks |
"Fort Worth Report," "The Rambler" |